Tuesday, December 30, 2008

still sorta M.I.A


I'm back, sort of. I'm not sure I'm ready to really be back yet. We went to visit my family (and T) in Utah over Christmas and it was idealic! Nothing to do. Nothing left to sew for Christmas. No church callings or work to handle. Nothing but playing in the snow with the kids. And shoveling snow with the 4-wheeler. So fun! (especially for us California people).

Anyway, there are crafts to share. . . but I wanted to show you this blog that a friend of mine shared with me. It's a whole years worth of crock pot recipes. No recipe book to buy. Love that. My goal for this next year is to plan meals for the month. I used to do this and it was so nice to not have to worry about "what's for dinner" and if I changed my mind, I had ingredients for another day. Plus - so much money is saved not running to the store a few times a month. So far, January looks like a month of crock pot yummy-ness.

Wednesday, December 17, 2008

Pillow for my Sis


My little sister moved into her very own place this year. It was a big step in my eyes considering I have never lived alone. while contemplating what to get her for Christmas, her lack of furnishings played apart in the decision making.  I made her a throw pillow to start with, in the colors of her new living room. I got the pattern from the latest issue of Stitch magazine.  I really enjoyed making this and I used a lot of scraps which was great because my scrap bin is over loaded. If you are considering buying this magazine, go for it.  It has so many great project ideas and patterns for a couple of  skirts. I have yet to try to make the the skirts. It is hard to find time to sew for yourself this time of the year but I will be making one come January for sure.   

Thursday, December 11, 2008

an un-ADVENT-ful december


I have been wanting an Advent Calendar for a while now. It wasn't until this past October that I saw one that I liked at Pottery Barn Kids. (I can't find the link. It must be sold out). I've had a hard time finding exactly the one I want. There are so many fun ideas out there. It's fun to look at everyones creations. Do you think it would be crazy to have a couple Advent calendars??

Anyway, I started this one in October. I only made it to day 15. The blank spots are going to be for big numbers. I still need to finish some of the ones that are in the picture too. I guess I could have continued working on the days to come, but I have so much that I'm sewing for Christmas and other people that I just couldn't fit in one more craft. (Plus, we're going out of town on the 19th and won't be here to finish it anyway). That's ok. I'll get it done by next year. I will. I promise. I can do it.

Saturday, December 6, 2008

Something for the kids.


I have been working on Christmas projects for a couple of weeks now. Nothing overly fancy but at the same time I will have to wait to post some until the holidays are over. We had a little extra time today and I thought it would be fun for my kids to do a little project of there own. My children are seven and four and both have taken an interest in sewing. So what ever knowledge I have to give has been fun for me to pass on. We started are Gingerbread man and stocking with some simple felt squares and traced two cookie cutters for the design. I taught my older daughter how to do the blanket stitch and off she went. I worked on the whip stitch with my four year and was amazed how it held her attention. All said and done I am proud of my little hand sewers and I think they are proud of their ornaments.

Wednesday, December 3, 2008

giveaway day

We hope everyone had a safe and happy Thanksgiving! We are back (well, I am. Tracy I hear is sick!) and are ready for our first ever giveaway. Love giveaways? Sew Mama Sew is hosting a giveaway day over on their blog. Click here if you're interested in entering in some more.


What we're giving away:
1 Amy Butler Anna Tunic Pattern
Very cute over a long-sleeved T-shirt. (view here)

What we want:: tell us your favorite Christmas/Holiday song and who sings it.

We'll pick a number randomly on the 4th and get it in the mail this week. US mailing addresses only.

edit - we'll leave the giveaway up until Friday at midnight and then pick a winner Saturday.

Good Luck!

Monday, November 24, 2008

Happy Birthday T

My goal has been to try and sew a Christmas gift a day to try and get everything done by the time we travel for Christmas. This past weekend I finished all of the stuff for my in-laws. 3 gifts down 4 to go PLUS the stuff I'm making for my daughter (doll clothes for her new doll from Santa, and I'm thinking of making this art case tutorial - I think it'll be great for church).

In the meantime I made these dish towels for Tracy for her birthday. They were easy and fun to make. I just bought some white towels from Restoration Hardware, patched one and did applique on the other.
Happy Birthday Tracy! I can't wait until next year for your 30th birthday party (yes - she's already planning it).

Friday, November 21, 2008

Tiny Doughnuts


I am not sure why, but it seems that everything that is small is so much more desirable than its true to size counterpart. Especially when it comes to food. I think that is why I always tend to eat more of the snake size candy bars than I would if I where to eat a regular sized bar.  Anyhow I saw a picture of these delectable morsels and showed them to my children and then they where smitten they begged and begged until I final gave in and made them. I saw them first on the not Martha web site which has some really good ideas. (I think I will try the pies in a jar next) The doughnuts where fun.  We made a Cinnamon sugar, vanilla glazed and my personal favorite lemon poppy seed. This is perfect if you need a little something sweet or 5 of a little something sweet.  

Saturday, November 15, 2008

"mom, can you make me a dress?"

I hadn't realized it until the other day that Anna had grown out of all of her dresses. Since we go to church every Sunday I thought I'd better make her some dresses. Plus, one night in bed she asked me if I could make her a new dress for church and that it needed to be made with my pink/red apple fabric.

This dress I made from the new Sandi Henderson Claire pattern. This pattern is nice because it goes from size 6 months to size 8 - so great if you're wanting to make matching/coordinating outfits for all your girls. Plus, you get 3 different dresses and 1 shirt with this patterns, so worth the money. And like Tracy mentioned before, just trace your size with patternease (which you can get at Joanns for $1.99 plus a coupon). I would suggest doing this for your expensive patterns. If you paid $1 for the pattern at Joanns it's not worth your time. Anyway, back to the dress - it was super easy to make! Probably only took me an hour or so max. I omitted the apron though - I'm not sure how I feel about the aprons sewn into the dresses. Maybe I'll change my mind later.
Here's the one she asked for. I can't help but love this pattern. Plus, she can wear it year round and with leggings next year. Gotta love that with growing kids, right!?

Wednesday, November 12, 2008

Lentil Soup


  I love the desire fall bring to eat nothing but warm soup and crusty bread. Tonight I made a soup for dinner that was really satisfying.  the fact that my oldest daughter ate it, without complaining means that It will be going on the list of things to make again.  I found the recipe in a book I have had for a long time but haven't used much it was calling my name.  I am glad because this is the second thing I have made from it this week it is the Food Everyday Cookbook "Great Food Fast".

Lentil Soup

3 strips of Bacon chopped 
1 large Onion, chopped
3 medium Carrots, peeled, cut in to 1/4 half moons
2 Garlic cloves, minced 
3 TBS Tomato paste
1 1/2 cup Lentils
1/2 tsp dried Thyme
2 cans Chicken Broth
1 TBS red-wine Vinegar
Salt and Pepper to taste

1. In a dutch Oven or other pot with a tight lid, cook bacon over medium heat until brown and crisp, 8 to 10 minutes. Pour off all but 1 tablespoon of rendered fat.

2. Add the onion and carrots; cook until softened. Stir in the garlic, and cook until fragrant, about 30 seconds.

3. Stir in tomatoes paste, add the lentils, thyme, broth and 2 cups of water. Bring to a boil; reduce to a simmer. Cover; cook until lentils are tender, 30 to 45 minutes. If soup becomes to thick during cooking, add water as needed (I added over 2 cup more.)

4. Stir in vinegar, and adjust salt and pepper.    

Happy cooking!!


Saturday, November 8, 2008

i'm not a foodie, but. . .

Tracy is actually the "foodie" having gone to school studying culinary arts. She's a GREAT resource for my pre-grocery shopping escapades to ask questions like "What's Mango chutney?" or "What isle do you think prosciutto is on?" (pretending like I KNOW what prosciutto is) and "Is Parmigiano Reggiano cheese the same thing as Parmesean cheese?" Stuff like that.

Here's some links to some tasty looking recipes I'd like to try:

Mini Fall Galettes
: as if I REALLY need an excuse to try another version of pie.

Peanut butter bars: I'm wondering if these are the same ones that used to get served with school lunch. Remember those? Mmmmm. . .

Fried Scones: with honey butter. Yummm. . .

Breakfast Burritos
: these just sound good to me.

Chicken Enchiladas: had to at least throw in 1 dinner!

What I'm REALLY looking for are good crock pot recipes. Does anyone have any???

Thursday, November 6, 2008

tutorial: covered button ponytail holder

This tutorial is probably unnecessary because it's pretty simple. I figured out a newer faster way to do it than the way I had originally been doing it, so I thought I'd share. I bought thin ponytail holders and a covered button kit that has 1 1/2" buttons. Any size button will do though. Then you need a strong piece of string.

Wrap your string around the elastic and insert it through the back of the button shank loop thing. Pull
Then Knot
Follow the directions on the box to cover the button. On the bigger buttons you can put a layer of muslin in between the button and the cute fabric. I highly recommend doing this so that the metal doesn't shine through the fabric. (I tried doing this on the smaller buttons, but it doesn't seem to work - too thick.)These make great, inexpensive gifts (especially if you can use a coupon at Joanns or check on etsy. Beware: these are very addicting to make!

Monday, November 3, 2008

Daylight Savings Bag

 I love Daylight savings time, not so much in the spring but in the fall. I feel like someone has given me a gift on extra hour.  especial when I trick my kids and put them to bed an hour early : ) So what do I do with this extra hour?  So far watched a movie with my husband, worked out and sewed.  I tried out a new pattern I got from Sandi Henderson from Portabellopixie. This is the Market Bag and it is the first patten of hers I have tried. I really like her patterns not only is the tissue paper they are printed on a bit heavier, but the instructions are in a full color and in an easy to follow booklet.  Her patterns are a bit more pricey than your craft store brands but all of the dresses go up to size 8. So if you have two girls like I do. You can trace the pattern of the smaller size on pattern ease and cut out the bigger size.  It makes it a bit more economical that way..........but I saved the best part for last she allows people to sell items made from her patterns, unlike some of the other designers.  Happy Sewing.  

Friday, October 31, 2008

Tuesday, October 28, 2008

what i learned

Sorry to butt in post-wise again Tracy, but I think I need to do this as therapy for having spent so much time on something that turned out so wrong.

The dress is Vogue 8468. I've spent the past couple nights cutting out the pattern and all day today sewing. It's fully lined - I mean fully. Even the sleeves are lined. I opted not to line the sleeves.
Sewing is about learning and here is what I learned. I guess you could consider this a pattern review of sorts:

1. Too much floral really is too much. Even if you love the pattern. Solid is probably best with accents of the floral. Unless you're a kid. Then anything goes.

2. Just because the drawn picture looks cute on the drawn model on the pattern cover doesn't mean that it's cute as a real dress on a real person.

3. The gathering is just above the chest causing that part of the dress to poof out - and not in a flattering way to those of us that could use a little poof.

4. I did learn how to put in a zipper (that's not an invisible one) and practice putting in sleeves. I made one size smaller than I measured.

Right now, I can't decide whether or not I'd try the dress again in a solid color. Maybe. Right now is not the time to decide. I would gather the top going all of the way across versus just "in between the small dots". I think that would solve the "poofing" problem. I'm not sure all of the lining is necessary either. It makes the dress feel very heavy. I would rather wear a slip underneath. Or use a silky lining.

Luckily there is enough fabric on the dress that I can use it for a dress for Anna or some bags or something. Bibs maybe.

Sunday, October 26, 2008

Day 2

Here's the outfit from Day 2 on the list. It is this pattern. I found the fabric at Joanns for 50% off. It's very sweet little trick-or-treating teddy bears. Completely not my typical fabric choice, but there is just something sweet about it. I made it a dress for this year so that next year she can wear it as a long top with leggings.

Saturday, October 25, 2008

Punkin Pie

We went to the BEST Halloween party a couple weekends ago. You can see pictures here and here. I brought a pumpkin pie that I made. It was for completely selfish reasons - I love pumpkin pie and will make it whenever possible.

Tracy is the true connoisseur of pies having made the desserts for a nice restaurant in Utah for a few years and gone to school studying culinary arts. I will fake it for you. I just use the recipe off of the Libby's pumpkin can BUT with this one alteration - split up the sugar, meaning do half granulated and half brown sugar. Mmmm. . . pie. . .

Thursday, October 23, 2008

Book Favorites!


    I love craft/sewing books. I mean how could you not?  Even if I don't read them or do any of the projects inside the books, they are most always very inspirational and full wonderful eye candy photos.  I thought I woulds tell you about three of my favs. The first is one of the first sewing books I ever bought "Denyse Schmidts Quilts" I love this book it is filled with basic projects and some really beautiful quilts. It was the first time I had really ever seen modern quilt patterns and it transformed my perspective on quilting.  The quilts in this book are not your Grandmas quilt they are unique and really fun.  Not that I have anything against traditional quilting patterns I just think this book is really refreshing. 


  The second book is "Sew U" by Wendy Mullin. This was one of the books I bought when I decided I wanted to start making clothing for myself.  It is a great place to start, with out being to simple. This is also one of the books I have read from cover to cover, and have used all of the patterns.  There is a basic skirt, shirt and a pair of pants and the best part is that she also shows you how to change the patterns to suit your style needs. I still use this book all the time as a reference.  

  The last book I have to admit I just got yesterday, but I already love it! It is "Seams To Me" by Anna Maria Horner.  I had to buy it!  I have used her fabric for a while and I also read her blog. I think she is amazing.   I was really excited to get this book, and so far the projects look really creative and different.  Which is one thing I have noticed in some of my other books is lacking.  I have several book that seem to contain the same projects. I mean how many instruction on making napkins does a girl need? but I really didn't find that from this book the patterns are more original. I can't wait to get started on the "Bow Peep Skirt" in this book.  

 Well these are my favorites I would love to hear what your favorites are, and I am always looking for the next book to buy so please post any suggestions!  


Sunday, October 19, 2008

13 days of halloween


I took this picture last year, but it still give me the creeps just remembering it!

Just for fun I thought we'd do the 13 days of Halloween count down this year. Here's out list just in case you're interested in counting down too!

Day 1: (starting today - sorry for the late post!): pull out the Halloween decorations and put them up. I got some really fun bat garland from Michael's (courtesy of Martha of course!)

Day 2: Wear a fun Halloween outfit to preschool (picture to come).

Day 3: Make spooky invisible suckers.

Day 4: Make pumpkin ornaments.

Day 5: Watch a Halloween movie.

Day 6: Read some Halloween stories.

Day 7: Make a pumpkin bird feeder.

Day 8: Make Creep Cakes.

Day 9: Write a Spooky story.

Day 10: Color some spooky pictures.

Day 11: Stitch some dot-to-dot cards.

Day 12: Carve Pumpkins.

Day 13: Happy Halloween!!!

for lisalou - and you if you want


Lisalou asked that I post the pattern for the bib that I used. Here ya go!

Saturday, October 18, 2008

i'm sensing a theme in my fabric buying. . .


Here are some bibs that I made for a friend who is having a baby. It wasn't until I was finished with them that I realized all of the fabric I chose had a blue/turquoise background. I want to keep them. But I won't. Still a little too girlie for baby C.

I have a bib that I really like the shape of that I just used as a pattern (cut a little wider than bib. Sew right sides together leaving an opening, turn right side out and top stitch). On the back I used terrycloth and flannel, but I think I like the terrycloth best. It makes the bib feel a little more substantial. Coolest of all though is the nifty snap presser thing my MIL gave me 5+ years ago that I never took out of the package because I had NO idea what on earth I would use it for. Laying in bed one night I realized the coolness of the tool and remembered where I had put it in my closest (a small miracle indeed). So. The bibs close with a snap. It's wonderful!

Thursday, October 16, 2008

Oliver+s Patterns

I love Oliver+s Patterns this is the second one I have tried. I think the designer has captured the sweetness of childhood. My older daughter is almost eight, and when we go to stores to find her clothes I feel that most of the clothing are patterned after adult clothing. In turn they make her look older then she is. I really don't want her to grow up to fast. So I was really excited when the fall line of Oliver+S patterns came out with sizing up to size 8.  To bad she doesn't always like the things I make for her. That is why I guess I sew for her little sister who is more than happy to wear mom's homemade goods.  

Monday, October 13, 2008

ideas of gifts to make for christmas

I have to admit, I am not much of a procrastinator. I think my husband feels left out every year at Christmas because I have most of the shopping done by November. This year, I will save time for him, but I have to admit - I know what I'm making for pretty much everyone. I've even got it all cut out and in bags so that it's ready to sew whenever I'm ready to sew. . .

Here's a few ideas in case you're thinking about Christmas in October.

Beanbags: I'm thinking of making these for Carson. He likes throwing things so I might as well make him something that won't break.

Ponytail holders: great for little friends.

A list of 54 Free apron patterns.

If you're not going to make your grandma fabric grocery bags, maybe you could help her tame all of her plastic bags with a nifty grocery bag dispenser.

A belt for your stylish sister or friend.

Dish towels - always a great idea. Plus, cute and easy.

more to come. . .

Wednesday, October 8, 2008

crafty cork board

I had never considered myself "crafty" until this project. Perhaps being "crafty" has held a stigma of my mom and aunt toll painting cutesy pumpkins and other Relief Society-making-wreaths-out-of-garden hoses type projects. But, now I give in. I'm crafty and that's ok dang it.

I've been on the hunt a while now for a cute cork board or magnet board that I can put in my laundry room to post notes on (or more likely stuff I want).

Anyway, the space that I wanted to put it in was sort of limited so I decided to make my own. Walmart sells a 4 pack of cork board squares that are 12 x 12 (but they are pretty thin) for only $5. I wanted them to be thick as if they were on a canvas so I decided to hot glue 3 of them together. (Also, one is too thin to use - the pin would just hit the wall).

Here's how I did it. It's so easy I'm not really sure that a tutorial is necessary but what the heck.

1. Hot glue the cork board together. I did 3.

2. Cut fabric 16 x 16. I also cut out a piece of muslin to put in between the fabric and the cork board so the cork board wouldn't show through. Don't forget to iron your fabric.

3. Layer the fabric (wrong side up), muslin, and then cork board and pin up two (opposite) sides. I just used push pins to stick the fabric down so I could use the fabric again and switch out the fabric when I wanted to.


4. Fold up the other two sides. The easiest way to explain how to do this and have nice corners is to fold up the ends like you do when you wrap a gift - except fold that top flap towards the board with the bottom flap following.

5. Make sure everything is pulled nice and tight.
Viola - you're done. I covered some buttons and hot glued them onto push pins so the pins were cute too.


edit:: I should have put on here what I did to hang mine. Sorry for those of you that have had their boards fall off their walls (and then destroyed by their toddlers). I just hot-glued a picture hanging hook to the back of it.

Monday, October 6, 2008

Her name is Emily.

I had so much fun making this little doll.  She took forever. So much so that I am having a hard time giving her away. I actually made her for my darling little niece but I can't seem to part with her sweet smiling face. I got her pattern from one of my favorite blogs  by Hillary Lang She is very talented at making all things small.  I think I will have to make another one for my niece for christmas.     

Thursday, October 2, 2008

7 things about these two BFFs

Jen tagged us a few days ago and I thought it would be fun to list 7 things about us you didn't know!

1. I remember Tracy's first day of school in 7th grade (or was it 6th?). We were in gym class and she came in. She was wearing jeans and a stripped bodysuit (remember those - not these).

2. I got married before she did. She had kids before I did. Her youngest is the same age as my oldest.

3. 1 year Tracy and I sent out the SAME Christmas card bought from Target. Out of the millions of cards we picked the same one. Funny!
4. This is my favorite picture of us.

5. The first time Tracy came out here for a visit I got in a car accident on the freeway on my way to pick her up. It was my fault. . . I guess I was just too excited!

6. Tracy married her hairdresser. She "stalked" him while he was in hair school. I think she got her haircut twice a month. He moved to Atlanta after graduation then later moved back to Provo. Somehow she found out he moved back and started going to him again.

7. Tracy makes amazing quilts! Maybe she'll show us her Halloween one (hint hint).

Sunday, September 28, 2008

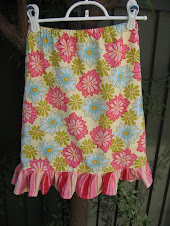
a-line skirt especial

This is the first tutorial I've ever written and I'm trying to figure it all out. So, at the moment, at the bottom of the tutorial is an entire sections to print the pattern from. I'm hoping to create a link that automatically just downloads it on your computer, but until then. . .

Introducing the A-line skirt Especial sizes 3-8. It takes about 1/2 yard of main fabric and 8 inches more of a contrasting fabric if you want to add a ruffle.

Step One: Print pattern and tape pages together. There are 3 pages then end up in an "L" shape. Match up all of the lines before you tape the pages together.
Find your size and cut.

Step 2: Cut 2 pieces on fold.


Step 4: If you don't want to add a ruffle - then you're nearly done. Sew up both side seams (wrong sides together of course), hem, sew a casing and insert elastic. Easy peasy lemon squeazy.

It would be cute to add a sweet little trim with bias tape to the bottom too as an idea.

If you want to add a contrasting ruffle then here are the rest of the instructions:

Cut two pieces of fabric 4 inches wide by double the width of the bottom of the skirt.

Step 5: Sew the two pieces of the skirt ruffle together, wrong sides together. Hem. Lengthen your stitch length and sew a gather stitch at the top. If you don't now how to gather here's a good tutorial on this blog. Make sure you readjust the stitch length before you continue.
Step 6: Put right side of the skirt together and sew up ONE side.


Step 7: Gather ruffle and pin right sides together to the skirt. Match the seam of the ruffle to the seam of the skirt. Sew. Turn skirt with wrong side facing up, fold up the ruffle seam so it lays against the body of the skirt. Stitch down. This creates a top stitch on the other side that looks really nice, and helps the ruffle hang straight down.

Step 8: Sew up the other side of the skirt (wrong sides together of course).


Step 9: Measure your child's waist and cut the elastic 1/2" longer. Make the casing for the skirt a bit wider than the elastic. I used 1/2" elastic. Insert elastic into the casing, sew the ends of the elastic together, and sew up the opening.


And you're finished. Now find a cute matching shirt - or maybe do some cute applique on a shirt to match from your scraps.

Here's the pattern pieces for you to print (to print put your cursor over the "iPaper" at the top left of the screen):

Friday, September 26, 2008

Peaches come from a can.....or a jar.

I can not stop putting things in jars. There is something so fun about canning food for my family for the winter. Even thought I can go to the Grocery store whenever I want and buy things all ready in a jar.  It is a lot of work but depending on the day I think my family is worth it.   Also I went to visit my grandpa last week and he gave me some of my grandmas old jars. It means so much to me to be able to do something that she loved to do as well, and who know maybe even my girls will love to put things in my grandma's jars to.  I am not counting on it.