Showing posts with label sewing. Show all posts

Sunday, May 30, 2010

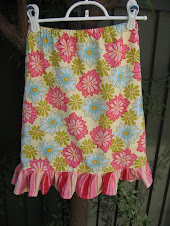
my baby gift to you: maternity skirt

A couple of years ago my SIL was pregnant and mentioned that I should make a maternity skirt. It took a bit to figure out, but wasn't as hard as I anticipated. I have sold a couple on etsy, but have never known how they end up REALLY fitting.

I believe I am past that "oh, look how cute and pregnant you are" and to the stage of sympathetic looks and "any day now, right?" comments. I guess it does look like I have a basket ball shoved underneath there doesn't it. (sorry, blurry pic taken by the 6 year old)

If you are interested in making yourself one this is essentially what I did:

Supplies: thread, 2 yards cute fabric, 2 yards lining fabric, 3" wide elastic (you have to determine how much, but I buy 1 1/2 yard making a size small skirt), 1/4 yard knit fabric to coordinate w/ pretty fabric.

1. I took the Amy Butler Barcelona skirt pattern (which I LOVE and sew all of the time when not preggo) in my regular size and traced it, front only. This works for me because I only get pregnant in the belly region (although last pregnancy my sister told me my butt looked big...), so I just use my regular size. If you tend to get pregnant everywhere, I guess go up a size.

2. I then took off 3 inches down from the waist. Save this piece (at least the measurement).

3. Cut 2 of your pattern on the fold of your outside fabric and then also your lining fabric.

4. Sew up the sides of both pieces.

5. Take the 3" waist measurement that you cut/determined in step 2. Double that length by 3" width and cut 2. Make sense??? Cut this out of the knit fabric. Sew to make one long piece. Sew those ends together making a giant loop, right sides together. Fold length of fabric in half like a hot dog, raw edges together. Iron (if it makes you feel better, I usually don't...)

6. Take your 3" elastic and cut 1/2" shorter than the length of knit you just sewed. Butt up the ends of the elastic in a loop and zigzag a million times to sew together (not overlapping, just end-to-end). Stick this elastic loop inside the knit loop you just made. Sew as close to the edge of the knit fabric against the elastic as you can (I usually move the needle to one end of the presser foot). Trim to 1/4".

7. With your pretty side fabric inside out put your lining fabric right side out INSIDE the pretty fabric. Sandwich your elastic/knit loop between the two, raw edges matching the raw edges of the skirts waist. Sew all three layers together.

8. I'm not sure how to explain the next part, but I think if you pull the lining part up, flip the pretty fabric right side out and then stuff the lining part back in so that it's on the inside, it'll all work out. If you have the AB pattern, she explains it pretty well, there's just not that 3rd elastic part.

9. Top stitch the bottom of the waist band (on pretty fabric, NOT knit fabric). Hem.

10. Wear!

Please please please - personal use only...

Wednesday, May 26, 2010

teachers gifts

As a thank you gift for Mrs. Grove for a great school year I made this bag. I think it turned out cute except that visually it looks lopsided (hence the added flower to hopefully distract). It is all straight though - I meant to make the green fabric strip larger in comparison to the other two, but I didn't make it dramatic enough. I think that's why it LOOKS lopsided. I used some Joel Dewberry fabric I have in my stash and made the bag in just a couple of hours.

We gave homemade jam to the teachers aids/helpers in the class. I found this blog that has the cutest little labels to attach with the jam. The labels are free. Check them out!

I brought this stuff to school yesterday even though we still have a couple of days left. It felt good to check this task of my list (and who knows! This baby could come 5 weeks early like it's older brother.) I think I am nesting, but not in the clean-every-corner-of-my-house way (much to my husband's dismay). I've been getting little crafty things done that I've been meaning to get to for the past 8 months!

Monday, May 24, 2010

a birthday dress

My daughter was telling everyone that I was making her a Birthday dress... I hadn't really planned on it seeing that I've made her a couple of dresses already this spring (which I've been meaning to post).

So, I guess I should make her a dress...I've been meaning to try that Oliver +S Birthday Party Dress pattern. I've had it for nearly a year. One night, or rather 2:00 a.m. I couldn't sleep, as has been the case since I've been uncomfortably pregnant. I got up and decided to trace the size I needed and get the pieces cut out. It's amazing what you can do from 2-4:00 in the morning when no one is awake or calling on the phone.

I just may have to do an actual review on the pattern someday when I'm not so hormonal. It was a pain in the neck to make. I think it turned out darling, and I love love the detail, but it required a lot of mark-transferring and ironing - two things I am barely willing to do. This dress required a lot of it though! After spending much more time on it than originally planned, my pleats turned out all wonky and I didn't blind stitch the hem. That's the great thing about sewing for a 6 year old... she doesn't care. She just loves the fabric "she picked out". And, well, I notice the pleats, but... I just don't care. Again, it's the hormones. And I must post a tutorial on making these flower hair clips. They are super easy to make and come together fast. Typically I make them in the minutes before leaving for church to match an outfit (that's how quickly they come together).

Wednesday, May 5, 2010

scrappy cards

I'm a big fan of sending (and receiving) cards via snail mail. I think email is nice and evites are free, but isn't it great to get something in the mail that doesn't ask for a "payment due by" or "vote for ________". For Mother's Day I made the mom's in my life some scrappy cards. I just picked up a pack of blank cards from Michaels ($4.99 with coupon), and used scraps from my growing bin of scraps.

It's one of those projects that I don't think you can really mess up. It's fun mixing and matching the fabric and seeing these mini quilts, if you will, come together into a fun gift set.

Sunday, April 25, 2010

more birthday love

My sister's Birthday was on the 17th. She's always growing her hair out and then chopping it off to donate to locks of love. She's in the growing out stage, so I thought I'd send her some hair accessories to make it less painful.

I too am growing my hair into a different style, so have been making headbands for myself. I prefer the skinny ones. You can buy a set of 4 head bands at Walmart for only $1. Black/Brown/Gold/Clear. I've been covering the gold and clear ones with fabric. You can find a tutorial here if you don't want to have to think about how to do it. She also has some cute embellishment ideas too. I've got more to show, but don't have pictures - some with feathers!
Yes, my son is the model. He thought he was hilarious. This is just 1/4" of felt rolled into a giant spiral. Hot glue every few inches. I found the alligator clips on etsy at mybeadjoy. They were pretty cheap. I think 25 for $2. There are all sorts of things at this etsy shop that you can't find at Micheals. The prices are great. The only downfall might be that the stuff is shipped from China, so it takes a few weeks...Same concept as the other one, but done with scrap fabric instead of felt.
Covered button super glued onto a bobby pin that has a base. Also from mybeadjoy.
There are two different kinds of bobby pins -black and silver. I've got some silver ones too. I think I prefer those. They are little bit longer.

Happy Birthday Emily!!!

Sunday, April 11, 2010

man-bag


It is part of my son's "outfit" to shove a bunch of cars in his pockets each day. Unfortunately he just can't fit them ALL into his pockets, so I thought I'd make him a bag to carry them around in (this also helps avoid the fits being thrown because he can't physically carry 10+ cars in his arms at the same time!)

I used (sort of) the bag from Bend The Rules Sewing (the one with the apples), but made longer straps and different dimensions. . . so basically I just made it up as I went - but I had sewn the Amy Karol one before, which was helpful.

I used the "wrong side" of some denim fabric I had on hand and lined it (and appliqued) with some canvas-y type fabric from Walmart. The straps are just the two strips of fabric sewn together with the edges raw.I tried to make the bag as manly as I could (w/o spending hours and hours making it).

My husband is embarrassed when Carson carries around his "purse" full of cars.

Thursday, January 28, 2010

i CAN finish this. i know i can. i will. i swear it.


Tracy always tells me how quilting is SO much easier then making clothes. Maybe. But my problem with quilting is that I'm impatient.

It's not quilting's fault.

It's me. Not you.

Tracy sent me a lovely quilt for Christmas that I snuggle in while watching t.v. It's just mine. Reserved for me. Poor shivering husband says to me the other night while under a different (smaller) blanket "maybe you should make another blanket".

Yeah, I guess he's right.

So I started looking at quilt tutorials online and decided on a Stacked Coin quilt. It actually looks harder than it really is. Mostly it's time consuming. The first day I cut all of the top strips and sewed them together. I even cut out all of the white strips too. And then. It sat. Here and there I've sewed a strip or two together. In between it all I've made some headbands - cute ones for moi, cut out two patterns, cut out PJ pants for the boy and just got my miniBoden catalog in the mail yesterday and tore out a bunch of pages of cute appliques that I'm just itching to, ahem, recreate (for personal use, of course).

Today I finished the entire top. I knew I would never get to it if I didn't just sit down and do it. Especially with all of the applique possibilities in my mind.

I love it.

It's beautiful.

I love seeing all of my fabric in one place, and I love that the white balances out the chaos.

Now to finish it. Hmmm... I DO have the batting. And a walking foot attachment for the machine.

And I DO love it.

I'll finish it.

Maybe tomorrow. Maybe.

Next time though, I'll make this quilt instead.

Tuesday, January 26, 2010

can i make up for the 1st trimester absence?

I was going through my iPhoto and saw some pictures that I took of a craft show I did in October. I had signed up to do it in September and then luckily sewed a bunch at that time because October through December was no-fun-for-me. First Trimester sickies.
I had sort of given up on craft fairs because I don't make much money and since all of my stuff has to be handmade it's not like I come up with a design and then pay someone to screen print it en mass on t-shirts or something. But this was a real craft fair at an Art Gallery in a nicer part of the Bay Area, not just a local craft show at the local elementary school or something, so I decided to give it one last shot.

I didn't actually make very much money (I'm not sure anyone did due to low traffic), but it was one of the neatest things to participate in. The other crafters were so amazing, true artists. I felt like such a geek with my head bands, hair clips and nursing covers. You could definitely tell what stage of life I was in by all of my mom/little girl items.

Some of my favorites were:

Ohmay
- the most beautiful and creative knit scarves/ascots/accessories. Just lovely.

I would love one of these bird stakes in my yard.

This guy's insect art is a-maz-ing and beautiful and I must have some butterflies.

Oh yeah, it's funny too. Beetles walking dogs and riding bicycles, silly things.

and my favorite were these recycled paper earrings. Oh how I had to exercise some self control!

I was next to a girl who does craft fairs as a full-time job. She said at the big ones she makes $3000-$4000. The entry fee is around $300+. Do you know how many hair clips I'd have to make JUST to make up my fee?? Not worth it in my book. Most of her stuff is screen-printed (her designs), so it's not hard for her to mass produce. She was really nice and helpful.

It was fun doing the craft show (and hey - now I've got a bunch of items made to sell and gifts to give away), but mostly because of the kid free day away and being surrounded by gifted people. I'm not sure I'll be a seller at another craft show, but I'd love to go and buy next time!

Sunday, January 17, 2010

Tie Quilt

And. . . I'm still here. Is anyone else??? Sorry. . . Merry Christmas? Happy Holidays? Happy New Year?

I HAVE in fact been sewing and need to post soon, but I've also been working on having my family blog printed into a book and that, my friends, has taken forever. But! I just got it in the mail and it was worth every minute of computer torture. I'll take pictures and show it to you because you should totally make one.
Anyway, the above quilt is NOT mine. In fact, I took a picture of it over a year ago and have been meaning to post about it because I think it's really neat. It was made by a woman in her 80's who's husband passed away and happened to own hundreds of ties. That's right. All of those strips of fabric came from her husbands ties! You can really see the 70's in there! What a fun concept. Not that I have EVER made a quilt, but I certainly appreciate the art/craft of it.

What a fun treasure this quilt will be. Seeing all of the different fabrics and remembering grandpa wearing them. I would like to do something similar, but with cotton shirts of my grandma's maybe?? Or maybe my daughter's baby/toddler clothes if I can stand cutting them at all?

Monday, October 5, 2009

scrappy abc's


I came across this tutorial the other day for quilted letters. I thought I'd make letters for my son for a Christmas gift. I think they turned out cute and it gave me a chance to use my new darning foot, which I paid $1 at Joanns fabrics. I'm certain it isn't generic enough for MY machine since I have to rig it up with an elastic band... (I think if you enlarge the picture you can see some of the crazy quilting - like on the "U".) It's fun to use, but would take a lot of practice/patience if I wanted to use on something that was for someone who might notice all of the mistakes.

This project kind of takes a while, but is something easy to do whenever you have a spare minute.

and

It doesn't make noise + No batteries required +Can be thrown in the washer + Great use of scrap fabric = great gift!

Wednesday, September 16, 2009

simplicity 2628

I vowed earlier to never sew patterns by Simplicity/Mccalls/Butterrick ever again. They just never turn out right. Well... I lied. I thought this shirt looked like it had potential. And after realistically choosing the right size for my 5 year old (size 3), it turned out alright. I chose fabric that I wouldn't mourn the loss of if the shirt didn't turn out right. I have a thing for corduroy and found this print at Joann's Farics a few years ago (bottom floral). It's all a little 70's prairie looking, but the actual shirt turned out cute, and I think I'll make it again with fabric I love.
Once again, the pattern calls for a zipper up the back. I think that zippers in shirts are weird, so I sewed up to the back leaving an opening. The neck is finished off with bias tape, so I just extended that for a tie. Gotta have a matching head band. BTW - this tutorial for headbands is SO easy! It literally only takes 10 minutes to make start to finish. It would be a great project if you're teaching your child to sew and makes awesome gifts! Add a little flower some buttons, ribbon, rick rack - the possibilities are endless. Plus - the way it's made even I could wear this headband it will stretch out that far.

The verdict: easy pattern. Great for beginners. If I would have made her "size" it would have been huge - so watch that. I'll be making it again I think...

I always wish there were more pictures when people review patterns, so here's some just in case you feel the same way.

Sunday, August 30, 2009

wedding gift


Don't you think cloth napkins make every meal seem a little fancier?
And if you're wondering... 1 1/2 yrds makes 9 napkins cut 14" x 14". Roll the hem. Viola - fancy.

Friday, August 21, 2009

baby gifts

I originally bought this fabric in hopes to redo my kids (shared) bedroom. Anna's side would be super girlie and feminine in turquoise and red and Carson's side would be simple and straight-lined in grey/turquoise and red rocket fabric. Well, my husband's car had other ideas in mind for our money. So, game off. But I still have this lovely fabric. I'm sure you'll see an outfit for Anna in the future, but I HAD to use it now. It was burning a hole in my sewing cabinet so-to-speak. My good friend from High School is embarking on the grand adventure of motherhood and is having a baby girl. I've been trying to decide what to make her, but it seems that bibs are my old stand-by. I love to make them. They are so easy and fun. If you need a pattern, I posted one here.

I've made the bibs a lot. I like to back them in terry cloth - if you use terry cloth beware that it stretches so sew it on with the terry cloth against the presser foot and the pretty fabric against the feed dogs (does that make sense??) Anyway, I've tried sewing on velcro, buttons, and snaps. My final verdict on the closure is BUTTONS. It can't be pulled off, it doesn't stick to other clothes in the dryer, and I've heard that the snaps fell off of some bibs I gave a friend a while ago. Plus, buttons are always a fun detail and it's good practice making button holes.

Thursday, August 13, 2009

School Girl

My daughter started Kindergarten yesterday. Of course she had to have a new outfit since all of life's major events require new outfits.

This is the (slightly revised) Oliver +S Sailboat Top and Skirt. I originally bought this pattern to make the cute little Capri pants version (here), but having taken an inventory of my daughters clothes she definitely does not need pants. Plus, it's still 98 degrees here.

I have to admit that I rarely really like the things that I make. I just wonder if I'd actually buy them if I saw them in the store - but I have to admit, I'm really happy with this little outfit. Something about red and white just makes me smile!
The pattern is really easy to follow and, of course, fun to make. I always enjoy sewing from this company. The fit is always great and I always learn something new. Plus their patterns are classic and traditional.

I made the following changes:

*I used 7/8" buttons (calls for 5/8") for the skirt

*Instead of long sleeves I just used bias tape to finish off the edges for a more summer-y version.

*Added a ribbon sash - the shirt is a little boxy, which is understandable since it's designed for boys and girls. I thought the sash would add a little shape and fun.

*Used a basic running stitch with embroidery floss to outline the skirt.
If you are a beginning sewer I totally recommend this pattern if you're wanting to sew for your kids. I always find buttons a little tricky (mostly the getting them even part), but pull out your manual and figure it out. Don't let buttons scare you away from making cute things. You can unpick them just like you can anything else (unless you've already cut the slit... then you're in trouble).

This outfit (sort of) completes the "spring collection", although it's not technically stated - I used the intended pattern just a little differently. Stay tuned for the Fall/Winter collection. It will mostly consist of shirts, a dress, and possibly a coat considering Anna has 5 pairs of jean, 7 pairs of Capri pants, 4 skirts... this girl does NOT need more clothes. I on the other hand...

Sunday, July 12, 2009

headband tute

After church on Sundays everyone comes home and takes a nap. Ahhh... it's quiet. This is my time to sew. Actually, today I sewed this headband before church and am spending the quiet time uploading pics and showing YOU how to do it. Aren't I so charitable ; ).

This is an EASY thing to make and would be a great intro-to-sewing project if you're looking to teach your child while on summer break. It also only took me 15 minutes to make and is a cheap and easy gift. Ok. Did I convince you to try it yet??

This tutorial is for a child-size headband. To make an adult one just add an inch or so to the length of each rectangle.

1. Cut 2 rectangles. The first one 5" x 16 1/2". The second one 3 1/2" x 8".
-You'll need some elastic. 1/2" to 1" wide depending on what you just have on hand. The length will be up to you, but 3 1/2" is what I used for my DD's hair.
2. Roll hem the long edges of the large rectangle. Technically speaking you should roll the hem 1/8" and iron then roll it again that much and iron again. But seriously... who does that? And what difference does it make?

3. Gather the short ends of the large rectangle down to 1 1/2" wide. I just sew 1 row of a longer stitch and pull the threads.

**don't forget to readjust the length back to normal after this.

4. Sew one end of the elastic on the wrong side of the gathered end of the rectangle. Fold the edges of the rectangle over the elastic (like you would a diaper) and stitch in place.5. Roll hem the SHORT edges of the smaller rectangle.


6. Fold the short rectangle length-wise right sides together. Stitch and then turn right-side out. Now you have a tube that will cover up the elastic on the back side.

7. Insert elastic through tube and pull tube up over the end where the elastic is sewn into place on the large rectangle. Top stitch in place. (I like the seam to run down the center of the "wrong" side)

8. Determine the length you need the elastic to be by fitting it onto the child's head. Cut elastic to fit and then sew it onto the other end of the rectangle (gathered side) Also do the diaper-stitch (see above) to the edges of the fabric.

9. Pull the rest of the tube over the other end of the elastic, and enough over it to hide any of the stitching and stitch in place.
It is WIDE, but I like to scrunch it onto my daughters head so it looks gathered.