I'm always amazed that you can actually make the treats that you see in the cute little sweet shops. Who doesn't love their apples smothered in caramel and chocolate??
While at Target I walked past a bag of Caramels. I figured I give the caramel apple a shot. I've made them with Tracy before. Ok. I watched while she made them the not-cheating way (involving a candy thermometer) and then I ate it. I was there more as moral support.
Anyway, I bought the bag of caramels thinking it would be a fun family activity. Well, it turns out - it's even fun when you're just making one. All you need is (for 1):
9 caramel squares 1/2 tbs water
melt in a small saucepan on low. Stir continuously.
Stick your Popsicle stick into the apple. Dip the apple in the caramel. You may have to roll it since you're not melting enough to technically "dip".
**don't refrigerate. It makes the caramel HARD.
Then. I melted chocolate chips in the microwave. Unless you know how to do this, Google it. It's not hard, but there is a way to make it smooth and dip-able.
Add nuts. Or candy. Or more chocolate. Or crushed pretzels. The possibilities are endless.
Wouldn't this be a fun gift for teachers? Neighbors? Co-workers? Cellophane, cute ribbon and tags? The holidays, they are a-comin'. Now, if only I could talk him into EATING the apple and not just lick off the toppings...
A lady at church gave me a ton of apples that she got from her sister who works for an orchard. Apparently these apples are considered "seconds" because they are not perfectly shaped and may have a bruise or two.Sweet.
100 apples.
But besides applesauce what can you do with apples??
How about APPLE PIE FILLING!!
Again, Sweet.
We are fans of apple pie, but I rarely make it because that whole apple part is a pain in the rear.
Now, I have 12 jars full of apple pie filling. Mmmmm.... The jar is just the right size to fill one pie, so now I just have to make the crust.
But, when you have 100 apples to peel, you MUST have one of these:It's an apple/corer/peeler. It's the coolest. I peeled 100 apples and was amazed every time. I even took it into my daughters Kindergarten class to show the kids since they are learning about apples right now. Amazement all around. (but mostly by me I think because I realize what a pain it is to do it the other way...)My BIL's (not) girlfriend took this picture. I'm pretty sure she thinks I'm the biggest dork ever. You should can apple pie filling. Really, it's easy. And what a fun teacher/neighbor/whoever gift. Fun fabric on top, a label with directions on how to make pie crust and there ya go. Gift.
Here's the recipe I used: (fills 7 Qt jars) -I think 5 apples per jar was what it ended up being.
*(approx) 20 cups of apples peeled, cored and sliced (about 5 apples makes 3 cups). slice and leave in a bowl of lemon juice
combine in a large pan: *4 cups sugar *1 cup cornstarch *3 tsp cinnamon *1 tsp nutmeg *1 tsp salt *10 cups water
cook on medium until thick and darkish brown. Stir, but not constantly. When it's thick, add 3 tbs lemon juice.
Fill canning jars 1/3 full of sauce. Put drained apples into jars smooshing down into the sauce until the jar is full. Use the handle of a large spoon to clear out the bubbles and spaces. Cover with hot lids and process in boiling water for 20 minutes. Here's some info on canning if you've never done it before.
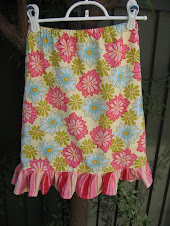
I vowed earlier to never sew patterns by Simplicity/Mccalls/Butterrick ever again. They just never turn out right. Well... I lied. I thought this shirt looked like it had potential. And after realistically choosing the right size for my 5 year old (size 3), it turned out alright. I chose fabric that I wouldn't mourn the loss of if the shirt didn't turn out right. I have a thing for corduroy and found this print at Joann's Farics a few years ago (bottom floral). It's all a little 70's prairie looking, but the actual shirt turned out cute, and I think I'll make it again with fabric I love. Once again, the pattern calls for a zipper up the back. I think that zippers in shirts are weird, so I sewed up to the back leaving an opening. The neck is finished off with bias tape, so I just extended that for a tie. Gotta have a matching head band. BTW - this tutorial for headbands is SO easy! It literally only takes 10 minutes to make start to finish. It would be a great project if you're teaching your child to sew and makes awesome gifts! Add a little flower some buttons, ribbon, rick rack - the possibilities are endless. Plus - the way it's made even I could wear this headband it will stretch out that far.
The verdict: easy pattern. Great for beginners. If I would have made her "size" it would have been huge - so watch that. I'll be making it again I think...
I always wish there were more pictures when people review patterns, so here's some just in case you feel the same way.
Toppings L-R: green onions, green peppers, tomatoes, chicken and pepperoni, mushrooms, homemade pesto (best part!).
My husband works really late every Tuesday night, so I make pizza for dinner. He hates pizza... I know! Who hates pizza?! That's why Tuesday night=pizza night.
I on the other hand *heart* pizza. I think I could eat it every day. Seriously. This is my favorite commercial. Every time I make pizza I totally admit to singing this song.
In my opinion - the ONLY way to make homemade pizza is on the GRILL. Oh it's so tasty! And so trial-and-error to get it right. But I've figured out what works for me. Tracy does it differently. I used to do it the way she does, but I am lazy.
Option 1: Tracy's way: she gets her grill REALLY hot and then puts the pizza dough directly on the grill. Then puts the toppings on. It's too hot for me. I don't like leaning over the grill that much when it's already 106 degrees outside. But, the flavor is a little different then the other options. Very tasty.
Option 2: use a pizza stone on your grill heated up to 500 degrees. I don't have a pizza stone. I think this is technically how it's "supposed" to be done. But whatevs.
Option 3: buy cheap pizza pans from the dollar store (since they'll get trashed by the grill). Make your pizza on the pans - toppings and all.
Remember to spray the pans w/ non-stick cooking spray. Have your grill heating while doing all of this then turn it on LOW-MED (this is the trial-and-error part), put your pizza on, and check after 6-8 minutes. Possibly rotate if not ready yet.
Enjoy! I love to put fresh Parmesan cheese on it too!
I modified a recipe for the dough, so I'll share it with you.
2 tsp active dry yeast 1 tsp sugar 1 1/4 cup warm water
mix together and let stand until foamy 3 1/3 cup all purpose flour 1 1/2 tps salt 3 tsp olive oil
mix these ingredients and then add the yeast/water mixture.
cover and let rise. *this is KEY*
This makes enough for 2-3 pizza depending on how thick you make the crust.
*When I roll out my dough I like to brush olive oil on the surface before I put on my toppings* Don't forget to sing ;)
also - this is so easy to make the day ahead and refrigerate. Pull it out to warm up the dough and it's ready. I usually freeze my left over dough too. I almost think the defrosted dough is better than the fresh stuff.
The recipe is good in that Artisan Bread book too, but I like to make mine in my food processor, and the recipe in the book makes too much to fit.
 I'm always amazed that you can actually make the treats that you see in the cute little sweet shops. Who doesn't love their apples smothered in caramel and chocolate??
 Now, if only I could talk him into EATING the apple and not just lick off the toppings...