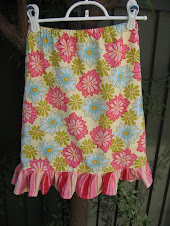
Introducing the A-line skirt Especial sizes 3-8. It takes about 1/2 yard of main fabric and 8 inches more of a contrasting fabric if you want to add a ruffle.
Step One: Print pattern and tape pages together. There are 3 pages then end up in an "L" shape. Match up all of the lines before you tape the pages together. Find your size and cut.

Step 2: Cut 2 pieces on fold.

Step 4: If you don't want to add a ruffle - then you're nearly done. Sew up both side seams (wrong sides together of course), hem, sew a casing and insert elastic. Easy peasy lemon squeazy.
It would be cute to add a sweet little trim with bias tape to the bottom too as an idea.
If you want to add a contrasting ruffle then here are the rest of the instructions:
Cut two pieces of fabric 4 inches wide by double the width of the bottom of the skirt.

Step 5: Sew the two pieces of the skirt ruffle together, wrong sides together. Hem. Lengthen your stitch length and sew a gather stitch at the top. If you don't now how to gather here's a good tutorial on this blog. Make sure you readjust the stitch length before you continue.
 Step 6: Put right side of the skirt together and sew up ONE side.
Step 7: Gather ruffle and pin right sides together to the skirt. Match the seam of the ruffle to the seam of the skirt. Sew. Turn skirt with wrong side facing up, fold up the ruffle seam so it lays against the body of the skirt. Stitch down. This creates a top stitch on the other side that looks really nice, and helps the ruffle hang straight down.
 Step 8: Sew up the other side of the skirt (wrong sides together of course).
Step 9: Measure your child's waist and cut the elastic 1/2" longer. Make the casing for the skirt a bit wider than the elastic. I used 1/2" elastic. Insert elastic into the casing, sew the ends of the elastic together, and sew up the opening.

And you're finished. Now find a cute matching shirt - or maybe do some cute applique on a shirt to match from your scraps.
 Here's the pattern pieces for you to print (to print put your cursor over the "iPaper" at the top left of the screen):


4 comments:
Great job Liz***** I want one for me!!!
I am so excited! As soon as I get my sling made, I am going to make this skirt!
Hey there Liz,
I know this is from a long time ago but I wanted to respond to your comment on patterns -- yes, I have seen a bit of the Burdastyle website, but have not actually been gutsy enough to print out all 30 or whatever pages it takes to make a dress or somesuch. Have you?
I love your embedded pattern here -- maybe I should think about using something like this for my patterns. Was it hard to use?
Thanks for stopping by the blog and commenting!
RAE
what an adorable skirt!
Post a Comment